In today’s fast-paced digital world, efficiency is key. Whether you’re a student, a professional, or just someone who enjoys saving time, mastering shortcuts can make a world of difference in your productivity.
One such shortcut that can revolutionize your workflow is the Snipping Tool shortcut. In this article, we’ll delve into what the Snipping Tool is, why it’s useful, and how to leverage its shortcut for maximum efficiency.
What is the Snipping Tool?
The Snipping Tool is a built-in screen-capture utility in Windows operating systems. It allows users to capture screenshots of all or part of their screens, providing flexibility and convenience for a variety of tasks. Whether you need to capture a specific portion of a webpage, an error message, or an image from a video, the Snipping Tool has you covered.
Why is it Useful?
The Snipping Tool offers several advantages over traditional methods of taking screenshots. Firstly, it allows for precise selection of the area to be captured, eliminating the need for cropping or editing after the fact. This can save valuable time, especially when dealing with multiple screenshots or complex images.
Additionally, the Snipping Tool offers various capture modes, including Free-form Snip, Rectangular Snip, Window Snip, and Full-screen Snip, catering to different capture needs and preferences. Whether you need to capture a specific window, a freehand selection, or the entire screen, the Snipping Tool has the versatility to accommodate your requirements.
Furthermore, the Snipping Tool provides options for annotating and saving screenshots directly within the application, streamlining the process of capturing and sharing information.
Mastering the Snipping Tool Shortcut
While the Snipping Tool can be accessed through the Windows Start menu or by searching for it, mastering the Snipping Tool shortcut can significantly enhance your efficiency. Instead of navigating through menus or searching for the application, you can simply use a keyboard shortcut to launch the Snipping Tool instantly.
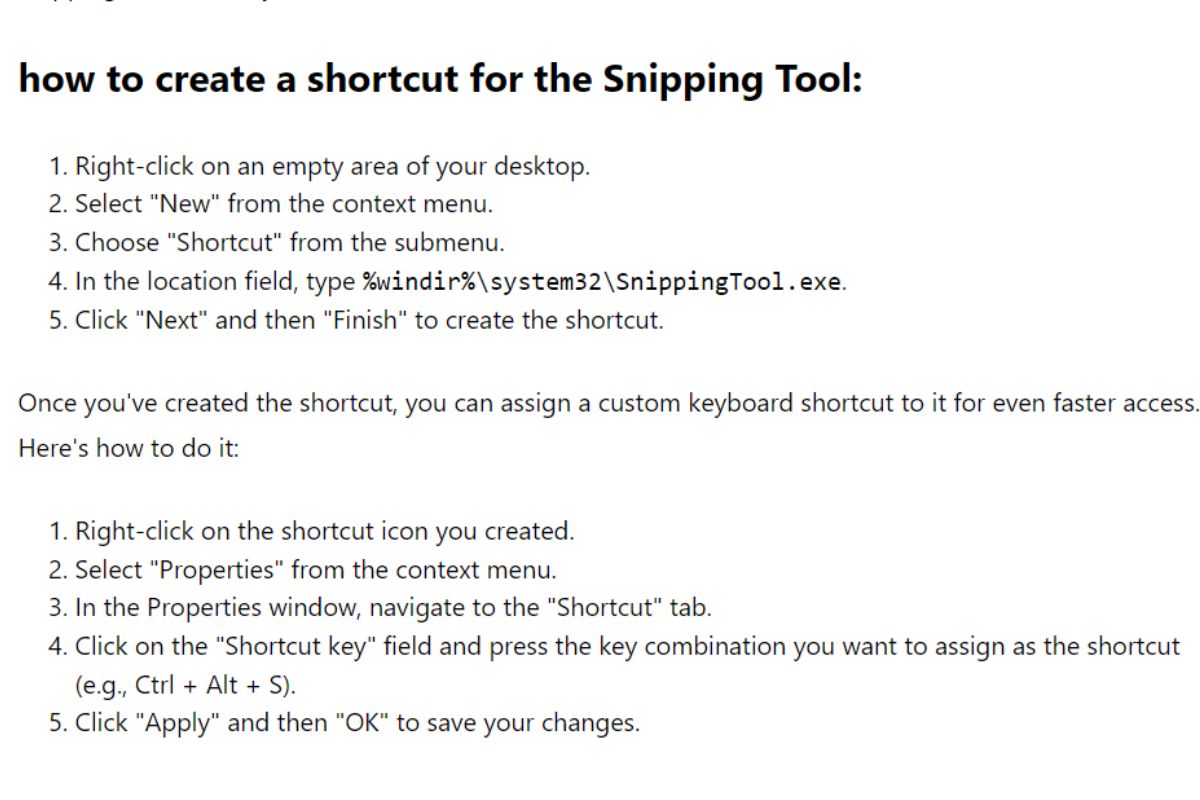
how to create a shortcut for the Snipping Tool:
- Right-click on an empty area of your desktop.
- Select “New” from the context menu.
- Choose “Shortcut” from the submenu.
- In the location field, type
%windir%\system32\SnippingTool.exe. - Click “Next” and then “Finish” to create the shortcut.
Once you’ve created the shortcut, you can assign a custom keyboard shortcut to it for even faster access. Here’s how to do it:
- Right-click on the shortcut icon you created.
- Select “Properties” from the context menu.
- In the Properties window, navigate to the “Shortcut” tab.
- Click on the “Shortcut key” field and press the key combination you want to assign as the shortcut (e.g., Ctrl + Alt + S).
- Click “Apply” and then “OK” to save your changes.
Now, whenever you need to capture a screenshot, simply press the assigned shortcut keys, and the Snipping Tool will launch instantly, ready for you to capture the desired area of your screen.
By mastering the Snipping Tool shortcut, you can streamline your workflow, save time, and increase your overall productivity. Whether you’re a student taking notes, a professional creating presentations, or anyone in between, this handy shortcut is sure to become an invaluable tool in your digital arsenal.
Conclusion
The Snipping Tool shortcut is a simple yet powerful tool that can enhance your efficiency and productivity. By taking advantage of this shortcut, you can capture screenshots with ease, saving time and effort in the process. So why wait? Start mastering the Snipping Tool shortcut today and unlock a world of possibilities at your fingertips.